Showing posts with label Perry Miniatures. Show all posts

Wednesday, June 14, 2023

Colonial Blockhouse

Stillwater Blockhouse Plan

 Last October, I decided to take part in the Little Wars TV Discord "Secret Soldier."  Basically, this was the group's version of a traditional Secret Santa swap, where wargamers picked names and traded gifts with each other.  I don't remember the exact parameters, but the idea was to keep the cost low, and buy/build something that your recipient would like.

28mm Colonial Blockhouse

For my gift, I decided to build a colonial blockhouse, such that may be found in New England during the French & Indian War or American Revolution.  I'd been wanting to build one anyway, being fascinated with the Battle of Shelburne Blockhouse, so I had much of the material on hand.

Early in November, I had a day to myself, so I traveled over to the Saratoga, NY area to visit the Stillwater Blockhouse, a replica that resembles what I've always pictured the Shelburne building to look like.

Stillwater Blockhouse on the Hudson River

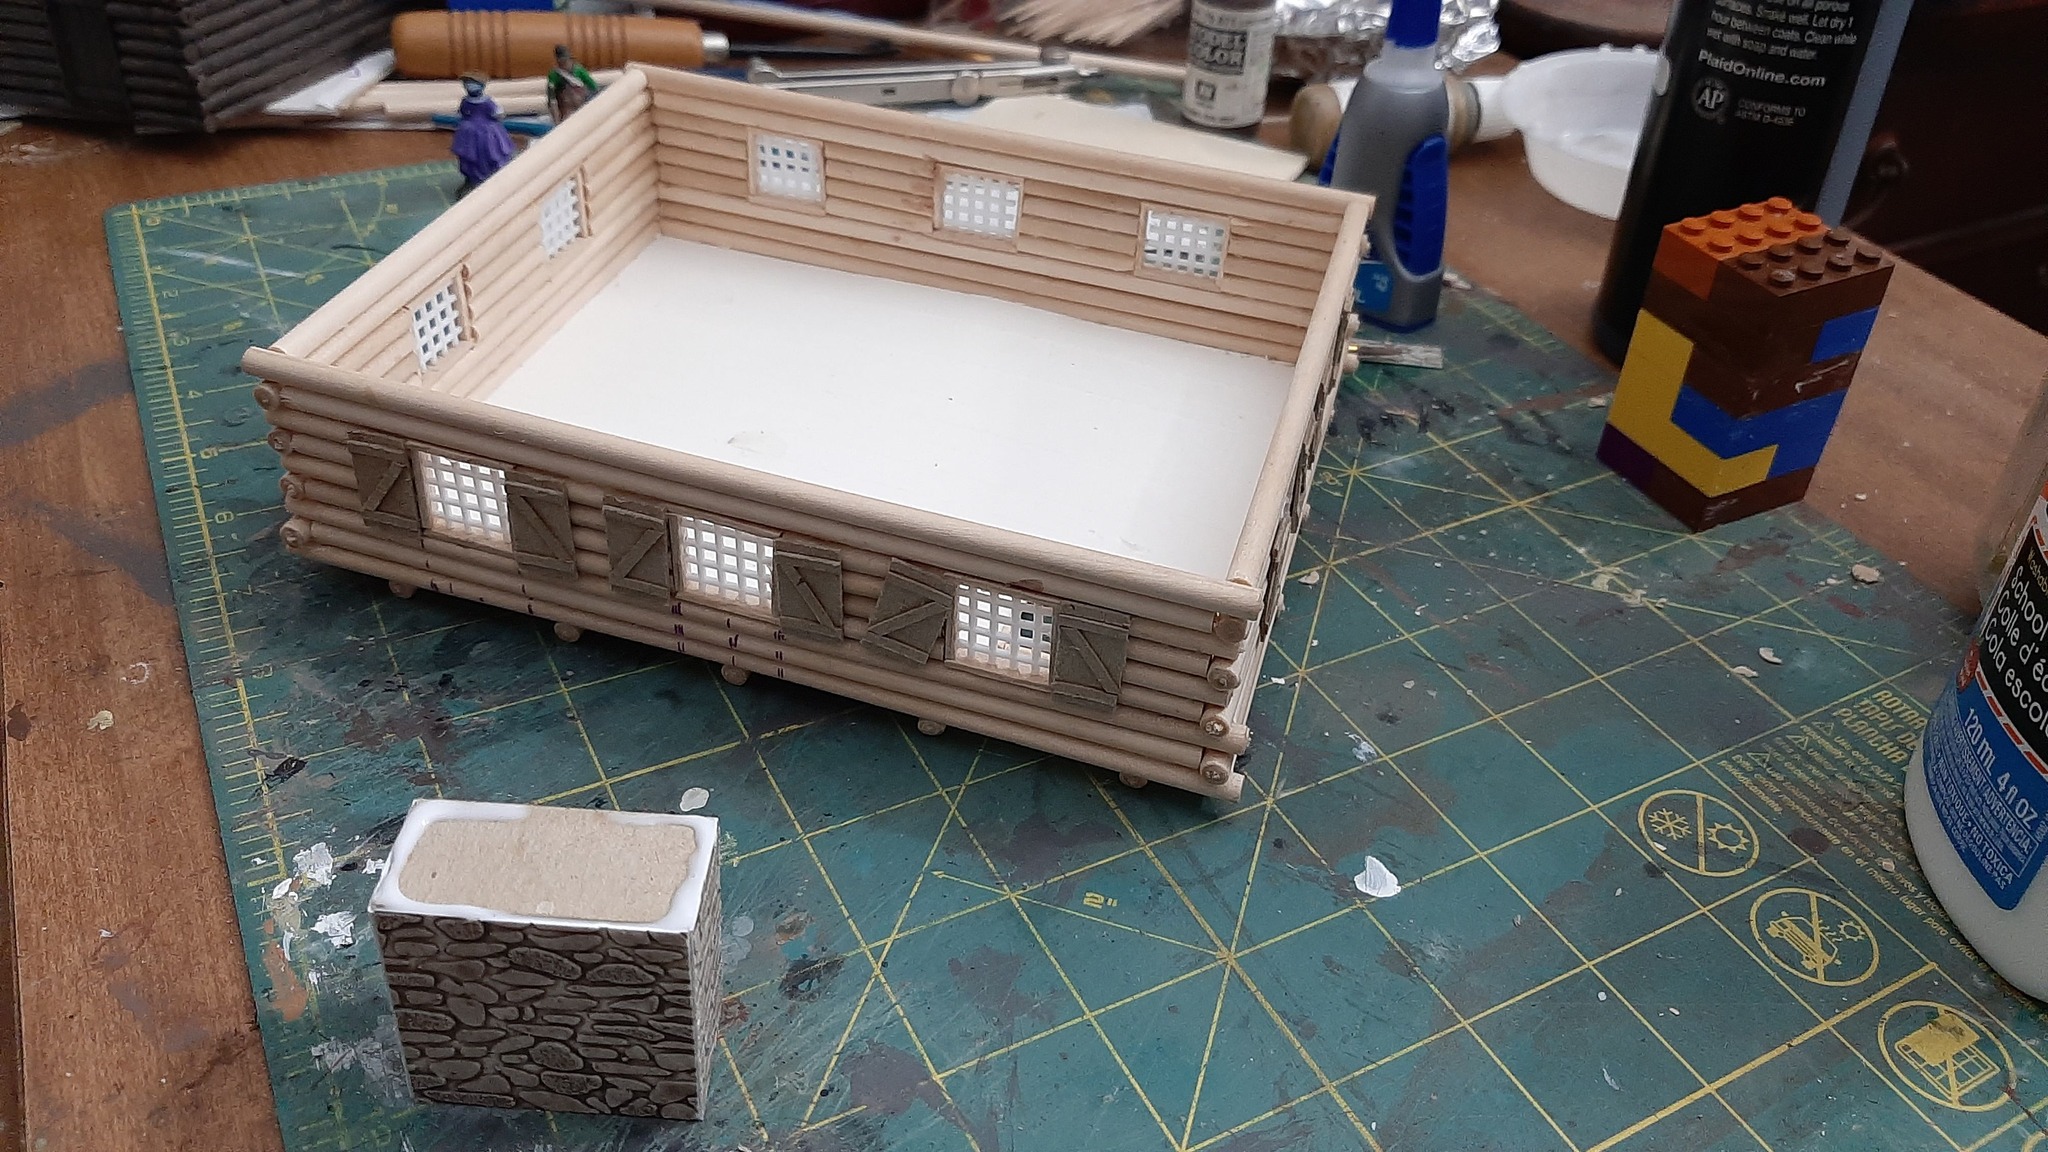
Based on photos I took there, I started building, tier by tier, with 1/4" dowels, cut to length as I went, to give a log construction look.  I was on a time crunch, so I didn't square off the dowels to get a perfect fit, but I still achieved the look I was going for.  I used a 28mm figure from Perry Miniatures Civilians pack to size the doors, windows, and ceiling heights.

First floor before stain and paint.

With the first floor finished, I stained the wood with a dark brown, then drybrushed with grey, trying to recreate the color of the Stillwater blockhouse.  I then moved onto the second floor.  Somewhere along the line I also decided to add a fireplace, made from card stock and stone patterned styrene.

First floor fireplace.

Patterned styrene was also used to represent the shingled roof.  With my deadline looming, this was the portion of the project that I rushed the most.  When all else fails, add more glue.

Second floor in progress.

Unfortunately, I missed the Christmas deadline for my recipient.  I did, however, finish the project in January and send it out to him.  Though the build was a bit tedious, adding courses one by one, I really like the look, and may build a second one for myself at some point.

Second floor complete.


Monday, December 23, 2019

LPL - Final Entries

With the year winding up, I'm going to include my final Lead Painters League entries in a single post.  Rounds 8, 9 and 10 saw me at the bottom of the pack, which was unsurprising.  Overall, I finished in last place, but I'm actually pretty happy with that.  Score-wise, I kept up with the competition, staying within 10 points of my closest competitor.  More importantly, I was able to get a lot more painted than I usually do, and proved to myself that I can make the time to paint if I put some effort into it.

Entry 8 - Rural Residents
My eighth entry to the contest was another set of Perry miniatures.  Most were civilian, but I believe one of the men on the right came from an infantry pack.  Overall I was pretty happy with how these turned out.  The field worker figure was my first time painting dark skin, and I wasn't sure how it would read, but it turned out okay.  Also for this round, I built a bit of background scenery, which I'll cover in a later post.

Entry 9 - Sharpshooter's Revenge
For the ninth round of the League, I assembled some figures from a few different packs of Perry Miniatures.  The man lying face down on the ground is from their plastic British Infantry set.  The man on horseback came from a pack of generals of some sort.  The two infantry men on the left started out as figures from an artillery set.  I carved off their artillery accessories, removed their right arms, and added muskets and arms from a British Infantry plastic sprue.  The crouching figure is not from Perry.  He was found in a box of random stuff I found in a drawer, and may have come from Wargames Foundry originally.

With this group, I'm happy with the poses and the overall scene, but I wasn't happy with the painting.  I rushed a bit, and the metal figures had been painted before, so some stripping and repainting was required.  I'm tempted to strip the paint from these again and make another attempt.

Entry 10 - 2nd New Hampshire Command
My final entry to the competition was a command stand that I painted up in the uniform of the 2nd New Hampshire Continentals.  I don't recall where these particular sculpts are from, but I believe they were intended to be militia originally.  After a short bit of research, I decided that I like the sky-blue faced red regimental coats and buff colored flag of the 2nd, so I went with that.

Finally, here are a few shots of the entire collection of miniatures that I painted for this year's Lead Painter's League.  Fifty figures was the requirement for the overall competition, and I managed to paint up 56.  I'm very happy with my overall output, and I like that I've painted up enough AWI sculpts that I can start to seriously look into hosting some small skirmish level games.

Lead Painters League 2019 - Overhead

Lead Painters League - Assembled Forces


Friday, December 13, 2019

British Wounded

Wounded Brits resting in a broken cart.
This little set of British wounded figures from Colonel Bill's landed me my second Lead Painters League win.  The figures are a bit squat and chunky compared to the Perry Miniatures that I own, but the poses are wonderful.  For Round 7 of the LPL, I decided to paint these up with a couple of different facings so that they could take the part of generic wounded British during games.  The cart is a Reaper Bones miniature, with a repurposed LEGO wheel substituted in for the solid medieval-type wheel that the cart came with.  I'm not crazy about the plastic used on the Reaper minis, but friends have mentioned that they really like them.  I may give another go at them at some point if I ever decide to work on any fantasy-themed projects instead of historicals.

Tuesday, December 3, 2019

Camp Life

Life in Camp
Round 5 of the Lead Painter's League brought me my first win of the competition.  The figures are from Perry Miniatures, and have tons of character.  This is a set that I've wanted to paint for a long time.  Years, in fact.  It's just a scene that seems so familiar.  When I showed the finished work to my daughter, I discovered why.

"That looks like our reenacting group," she said, "That's me braiding your hair, Gerry telling a story, Dave with his drink, and Chrissey cooking over the fire."

Completely unintended, but she's right.  I think I like this scene so much because it feels like home.

Also Life in Camp...

Monday, November 18, 2019

British Command - 24th Regiment of Foot

24th Regiment of Foot - Infantry Command
For Round 4 of the Lead Painter's League, I finally returned to the British line infantry that I started last year.  For this set, I tried my hand at blacklining to bring out details.  It looks slightly better than the five infantrymen that I painted up last year.  For this batch, I was very happy with how the drummer turned out.

24th of Foot Music
Flags for the unit were found online, scaled in GIMP, then printed on regular paper.  My collection for the 24th now has 10 men completed, and another 28 to go.

Sunday, October 13, 2019

Colonial Townsfolk

Perry Miniatures Civilians
The second round of the Lead Painter's League has ended.  My entry, a group of civilians from Perry Miniatures was paired up against some fantasy type figures.  My opponent won the round, dropping me from 19th to 21st place overall, but I'm still really happy with these figures.


I'm especially happy with how the well-dressed lady turned out.  I struggled a bit with what color to make her petticoat, but the shading on her overall gown came out well.  I need to practice shading some more, but this one felt nice to paint. 


The Benjamin Franklin looking gentleman I'm also happy with, though there are some improvements I would have made had I had more time to work.  I dabbed his face a bit at the end, and the slight blue highlight on his hat turned out lighter than I would of liked.  His base also needs some touch up, as some of the basing materiel came off as I was photographing.


The lady with the basket I tried to make a little more dirty and run down.  The biggest struggle was painting the baby on her back.  I don't know if it was the sculpt, or my painting, but he still sort of looks more gremlin-like and baby-like.


The fellow carrying the barrel suffers from the same basing and highlighting problem as the Franklin fig, but I was happy how his breeches turned out.  I tried highlighting with a darker color as opposed to using a wash on this one.


Finally there's the broom woman.  I'm not happy with her face, but her jacket, especially the back, turned out well.

On to Round 3 this week!

Friday, February 1, 2019

Survey Crew

18th Century Surveying Crew
For the past several months, I've had a minor fascination with surveying in the 18th century.  I've been reading a few books from the time period, teaching myself the techniques, and I made a short research trip to see some original survey documents.

A couple of weeks ago, I was browsing miniatures online, and realized that some of the artillery crews looked a bit like surveyors.  Remembering that I had an unpainted artillery unit, I dug out the figures and looked them over.  Sure enough, they fit the bill.  I decided to put together a vignette.

Before I get into the process, I'll walk through the final result.


Continental Surveyors.
First up, we have a couple of surveyors.  I painted these to be in the uniform of the Continental Department of the Geographer, based on images of the reenactment group that portrays those soldiers.  One is taking a sighting through his theodolite, while the other looks on, taking field notes.

Civilian Chainmen.

Civilian Chainmen.

Next are the chainmen.  I've portrayed them in civilian clothes, as if they had been hired from the local population.  The job of the chainmen was to measure distances using a Gunter's Chain.  In scale, a full chain would have been over a foot long, so I've severely compressed the length, but it still gives the impression.

Civilian Flagman.
Finally, there's the flagman.  His job was to mark locations that the surveyors could site to, and that the chainmen would measure to.


Perry Miniatures Artillery Men
I started off with a couple of figures from Perry Miniature's Continental Artillery aiming 6 pounder (AW102).  These had the poses that I was looking for for the main surveyors, but could use some small detail changes.  Namely, after stripping off their old paint, I sculped a small bit of paper into the standing figure's right hand, and I cut away the cannon adjustment lever thingy from the crouching figure (Artillery friends, does that tool have an actual name?).

Perry Miniatures British Infantry

Perry Miniatures Command Standard Bearer
For the chain and flag men, I had a couple of sprues of figures left from a box of Perry's American War of Independence British Infantry 1775-1783 (AW200), that I thought that I could customize.

Scraping Off the Cartridge Box.

Adding Hats and Changing Coats.
The civilians took a bit more work than the surveyors.  Since I was using uniformed miniatures for my base, the first thing I had to do was to scrape off the regimental lace from the lapels and cuffs of their coats.  Both figures featured bayonet scabbards, which I cut down to make into chaining arrow quivers, which would hold the markers used by the chainmen to mark out distances longer than their chain.  Since these men are civilians, and not soldiers, I next carved off their cartridge boxes and straps, then resculpted the backs of their coats to add in some folds.  I opted to leave their canteens.  They likely wouldn't have carried military canteens, but I wanted the workers to stay well hydrated.  The final step was to add their caps.  The Perry sprues come with riflemen's caps that are cocked up on the side.  For one figure, I turned the cocked flap to the rear, carving the interior a bit to fit the head.  I also scraped off the bit of decor that was attached to the flap.  For the second figure, I cut two of the riflemen's hats in half, then glued them together and resculpted a bit to make a single round cap.  The arms of both figures were originally carrying muskets, which had to be cut away and the hands reshaped a tiny bit.

The flagman received a similar treatment.  His lace was removed, and a civilian hat was added.  Since he had started out as a standard bearer, his arm position was perfect.  I cut away the top of the flag pole, adding it to the bottom of the figure's hands to create the staff.  A small target orb was added to the top.

The theodolite was scratch built from bits of sprue and toothpicks.  Being more than a bit fiddly, this went through a few iterations before the final version.

Here's the final modified crew before painting:

Raw Survey Crew.
After priming and painting the miniatures, the final step was to build a base.  Originally I laid out a flat base with the intention of adding some scatter terrain to fill in the empty spaces.  After priming the ground, I had the after-thought of adding a couple of small hilly mounds.  In retrospect, I'm glad that I went with this direction, as I think it makes the scene look more nature.

Crew Primed and Ready for Painting.

Initial Base Layout.

Let's Add Some Hills!

For comparison of the figures, here are some up close (occasionally fuzzy) images of each miniature

  
Crouching Surveyor - As Found, Before Priming, Finished.
Standing Surveyor - As Found, Before Priming, Finished.
Trailing Chainman - Before Priming, Finished.
Leading Chainman - Before Priming, Finished.
Flagman - Before Priming, Finished.

Scratch-Built Theodolite.
And here's the finished result, sitting proudly above my desk.


Nice Decor for My Desk.