 |
| Outskirts of Le Dézert, Normandy |
On 22 October, I took part in another
game of I Ain't Been Shot Mum (IABSM), by Two Fat Lardies. My
opponent Steve and I arrived at the home of our host and umpire, Dan,
at about noon. The day before, after having read the scenario, I
opted to play the German side, which looked like it'd be a
challenge.
The scenario comes from the book Heroes of Omahaand Panzer Lehr from SkirmishCampaigns. The scenarios appear to
be game agnostic, so Dan would tweak things a bit, possibly adding
troops to fit the IABSM rules set.
 |
| Scenario Map |
Initial intelligence given
in the scenario indicated U.S. troops just outside the village of Le
Dézert
on the road toward Saint Jean de Daye in Normandy, France, on the
morning of 11 July, 1944. My task, as commander of two elements of
Panzer Grenadiers and one armored section, was to move at least two
armored vehicles through the hedgerows and off the east side of the
board within 10 turns. As indicated on the map, the Americans may
have reinforcements coming in on that side.
Based on the map,
my initial plan was to put flankers out on either side of my main
column, which would drive up the road. Not knowing how thick the
bocage was, I also wanted to attempt to get a unit on top of the hill
overlooking the manor house, to cover my movement as I crossed the
bridge. The bridge looked like it would be the choke point, and most
heavily defended.

 |
| Initial Deployment |
One
armored section containing a Panzerkampfwagen Va. tank (Panzer), a
Sturmgeschütz IIIg tank (StuG), and a Sonderkraftfahrzeug 234
armored car (Puma).
Two
Panzer Grenedier infantry platoons, each with three sections of 10
riflemen and one Panzerfaust each, mounted on half-track personnel
carriers.
One
truck mounted Quad 2.0cm Flak gun
One
headquarters unit in a Kübelwagen
The
armored and infantry sections each had a “Big Man” officer
attached
For
the terrain, the bocage hedgerows were impassible for vehicles, and
would take infantry two actions to climb over, which would slow
things down. The hedgerows also blocked line of sight, but could be
fired out of and into. This would mean driving the vehicle column
blindly down the road, at least to the houses and bridge. The good
news was that the stream was shallow, and could be crossed by both
infantry and vehicles. I wouldn't have to use the bridge to cross if
pressed.
 |
| No sightlines? No problem! |
The game began with my German troops lining up along
the road. Since the Americans hadn't spotted us yet, blinds were
used. Due the bocage, I knew I wouldn't get a vehicle to the top of
the hill overlooking the houses, but, fearing a bazooka ambush from
the sides of the road, I decided to stick with my original plan of
sending out flankers. Infantry Platoon 1 was deployed in the field
to my right. Platoon 2 was deployed to the left field, dismounted
from their half-tracks. Along the road, I deployed in the following
order: The StuG took point. With no turret, but heavy frontal
armor, I figured it would act as my shield. The Panzer came next,
able to fire to either side of the StuG. Lightly armored, the Puma
was third, hiding behind the Panzer for protection. Behind the armor
came the Quad truck in support, with the HQ unit bringing up the
rear.

 |
| Lining Up |
The dismounted Panzer Grenadiers on my left flank moved
quickly up to the first bocage at the base of the hill and took an
action to see if anything was on the other side. Spotting no troops,
they climbed over the blockade and took up positions in the orchard
on the hill. On my right, the half-tracks of Platoon 1 are spotted
by the Americans, so the blind is removed. Steve now knows where
half my infantry is. My armored column, not wanting to get ahead of
the infantry, begins slowly moving up the road. The StuG, in front,
spots movement on the second floor of a house to the left. Lobbing a
shell into the house, the men there are pinned down by falling
debris. The Panther follows suit, also targeting the second floor,
which causes the Americans there to flee out of sight to the first
floor. Panzer Grenadier Platoon 1, hearing the opening bursts,
dismount from their personnel carries and move quickly up the the
hedgerow in front of them.

 |
On the move
|
 |
| Opening shot on target! |
Pulling
up to the end of the bocage along the road, the armored column takes
a moment to look at the upper floor of the building to their right.
The infantry on that side cross over the bocage into the orchard,
checking the first floor of the house. No enemy are spotted. The
Americans appear to have opted for a defense further back on the
board. Light mortar fire begins landing in the orchard, but no
damage is taken by the Panzer Grenadiers.
On
the left, Infantry Platoon 2 moves over the hedgerow, from the
orchard there, to the hill overlooking the buildings of the farm
complex. Now in the open, they take fire from the Allied side,
taking one casualty killed in action.

 |
| Clearing the flanks, and slow advance. |
With the right flank
clear, the tank crews move up and begin targeting the first floor of
the building previously hit. The Americans, seeing the danger, and
having already experienced two tank shots on the upper floor,
evacuate the building, taking cover in the larger structure in the
nearby farm complex. Platoon 2 on the left continues across the open
hilltop, hoping to take cover against the hedgerow in front of them.
They take another burst of fire from the buildings, losing another
man killed in action. Platoon 1 continues to take light mortar
fire, but they keep their heads down and out of danger. As they take
cover up against a stone wall surrounding the orchard, they take
infantry fire from behind the bocage on the opposite side of the
stream that splits the terrain. They take their first KIA. As they
set up to be on overwatch, two Allied M10 Tank Destroyers rumble into
view, blocking the road ahead.

 |
| Anti-tank guns arrive. |
Back
on the right again, my infantry continues taking light mortar and
small arms fire from Americans behind the bocage to the east. They
suffer one more man killed, but return fire, blindly shooting into
the mass of brush, rock, and trees ahead of them. Platoon 2 on the
left flank presses ahead, crawling through the bocage, crossing a
small lane and stream, and diving into cover behind a stone wall in
front of the occupied buildings. They are fired on, taking another
KIA for their effort. They fire on what infantry they can see on the
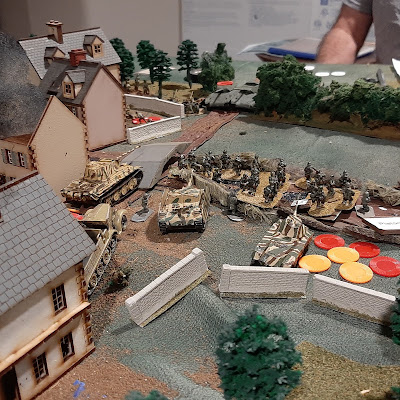
second floor of the nearest house. My armored column, seeing the new
M10 threat, begins to deploy for a fight. The StuG, in the lead,
pulls to the right, clearing the road for the Panzer and lining up
for a shot against the tank destroyers. Before the crew can take a
shot, though, one of the M10s opens up with a direct hit. The StuG
explodes in a massive fireball. The Panzer pulls up to, but not
onto, the bridge, leaving just her turret exposed to the enemy. The
second M10 fires, but the shell bounces harmlessly off the Panzer's
armor. The Panzer fires back, causing damage to the M10's machine
gun. The Puma, moving quickly, wheels around to the right of the
burning StuG, lining up to fire its gun across the river.

 |
| Deploying for battle. |
 |
| StuG down! |
On
my left flank, my Panzer Grenadier squad is furious. With one
section firing on the 2nd
floor of the building ahead of them, the other two squads rush the
building, coming into direct contact with the enemy. The Americans
win the melee, throwing the grenadiers back to the edge of the
stream. We kill four, but take five casualties of our own. A bloody
affair with no gain. The M10 tank destroyers open up again. The
Puma is missed at first, but a second shot lands square. The crew
won't be doing anything this turn. The Panther also continues to
take fire. A shot takes out the big cat's machine gun, but a second
shot bounces off its heavy armor. Platoon 1, seeing the anti-tank
gun, and taking infantry fire from their front, decides to advance
into the cover of the small stream, lobbing a Panzerfaust toward the
tank destroyers, with no effect. The American anti-tank gun also
targets the sitting-duck Puma, but its shots have no effect.

At
this point, the infantry of Platoon 1 on my right also begin taking
sniper fire from the hedgerow ahead of them. Another man killed. We
can't see them, but behind that bocage to our front are a mortar
team, an infantry team with machine gun and rifles, and now at least
one sniper. Who knows what else may be lurking there. The tank
destroyers are blocking the road, and the anti-tank gun will have our
left flank if we move forward. The stone buildings of the farm
complex are occupied by infantry, and we're taking casualties on all
fronts.
I
haven't seen any bazooka teams, but I have a horrible feeling they
are hiding in the houses, ready to hit my Panther in the side should
I cross the bridge. Though the first assault went horribly wrong, I
take a chance and rush the house on the left with my infantry again.
Though they take another KIA, this time the Panzer Grenadiers are
successful, dislodging an enemy machine gun and rifle squad from the
building. My platoon occupies the structures themselves, with one
squad on each floor, and another in reserve (and cover), just
outside. On the road, the German Flak gun opens up. The fire is
scary, but has no effect on the enemy. The American anti-tank gun
continues firing on the little Puma, the crew of which, finally
having had enough, quickly pull back to take cover behind the orchard
house on our right. Their morale is super low, and they'll likely be
out of the fight unless I can get them to rally. In my center, the
big Panther stays put, being in cover behind the bridge crossing. A
bazooka team finally reveals itself, but its shot bounces off the
cat. It's time to open up. The Panther fires a shot at the M10
ahead and to the right. The shell hits direct, turning the tank
destroyer into an exploding pile of parts. A second shot from the
Panther hits the second M10, briefly immobilizing it. A third shot
does the trick, hitting the second M10 again, causing it to withdraw
as its crew panics.

 |
| Puma retreat. |
 |
| M10 knocked out. |
The road is clear, but we're still exposed
on the flanks if we move forward.
Platoon
1, hunkered down in the stream, is getting whittled down. The
anti-tank gun, having dealt with the Puma, switched to anti-infantry
ammunition, killing one man in the squad. Machine gun fire from in
front kills another. Poking their heads up, they fire into the
hedgerow in front of them, and take another KIA from machine gun
fire. On the left, Platoon 2 takes advantage of their new position
in the house, firing with deadly effect into the flank of the
American anti-tank gun. The crew abandons the gun and retreats. At
this point, the Americans in the larger farm structure, and the
Panzer Grenadiers in the house, begin firing back and forth across
the courtyard at each other, both having heavy cover, but plinking
away at each other. In an effort to clear any threat should we
decide to move up the road (and we need to), the Flak gun blindly
opens up on the corner of the bocage, hoping to inflict maximum
damage on anything hiding in there. While we couldn't see it, we
managed to take out half of the bazooka team. The Panther at the
bridge once again fired on the remaining M10, this time knocking it
out completely. Having been rallied by my Headquarters unit which
had been creeping down the road during the firefight, the Puma
recovers, and takes up position on the bridge in front of the
Panther. At this point, the game was ending Turn 7. While I still
had threats ahead and to the right, if I continued to move slow I may
run out of time.
 |
| American AT crew takes rifle fire. |
With
the vehicle column reorganizing behind me, my infantry on the left
kept up their gun battle with the Americans in the farm. Trading
several bursts with each other, the American squad on the second
floor finally broke and ran, while their men on the first floor
continued to fight. On my right, in the stream bed, my infantry
rallied their courage for one last push. With the overall commander
of the mission shouting them on, Platoon 1 rose from the stream,
rushed across the open field, and threw themselves over the bocage
and into direct contact with three enemy units. A fierce
hand-to-hand combat ensued, with the Germans overwhelming the right
side, and the American winning on the left. This caused the combat
to swing sort of counter-clockwise, with the remaining Germans taking
on the remaining Americans, who finally gave ground. With the loss
of both his armor and his left flank, my opponent conceded,
withdrawing his remaining troops to fight another day.

 |
| The final push. |
This
was a great game, which really felt like it could go either way at
any time. Had this been a campaign game, or, God forbid, actual
combat, I probably wouldn't have made the three infantry assaults,
but the time limitation pushed me to be a little more risky than I
usually tend to be. At the end of the day, I had taken 20 KIA
casualties, plus whatever men I lost in the final push, along with
the StuG that was knocked out at the beginning of the mission. Given
that I had two 30 man platoons, I took over 30% casualties. To their
credit, my officers did their jobs well, and kept the men from
breaking, leading to the eventual win. Had they not done that, I
believe we would have all been captured without crossing the stream
at all.
Big thanks to Dan and Steve for a great game!
 |
| Onward to St. Jean de Daye! |




.jpg)


